How to download YouTube Video, MP3, Playlist for iPhone 5S and 5C For Free


Finally, iPhone 5s and iPhone 5 C have been released. If you are about to get your new Apple product, you might be interested how to fill it with your favorite songs and video clips. That’s where you need a good and free YouTube Converter. Let’s learn how it works.

First of all, let’s install free software that will help you. I recommend Freemake YouTube Converter because it can download various YouTube files such as video, songs, playlists and so on.

Click “Download” button on a site to start the downloading process. Then start the installation. Please, be attentive. The software will offer you to install some other programs. If you don’t want to have them on your PC, opt out of any offers. However, it’s the only disadvantage of Freemake YouTube Converter.

If you download YouTube on a regular basis, agree to install a special browser extension. It will let you grab YouTube in one click.

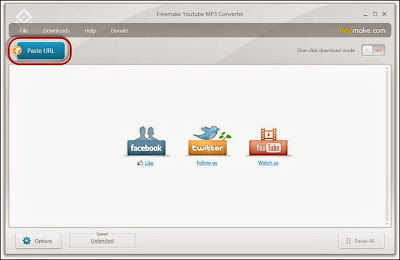
As soon as you are done with the installation, run the software. As you see the interface looks pretty much easy to use. Everything you need to do it to copy and paste YouTube link into it.

FreeMake Youtube Convertor

Now choose what you want to do:

1) Download YouTube video:

When you paste the link into the program, choose a desirable video quality and “Convert to iPhone/iPod” option. Click “Download&Convert” to save videos onto a PC.


Download Youtube Video

2) Download YouTube song:

Paste a link to music video that you want to save in MP3. Again, choose a quality and “Convert to MP3” option. Select “Export to iTunes” if you want to send new files right to your iTunes media library.

Download Youtube Audio


3) Download YouTube playlist, channel, favorites:

Go to YouTube playlist or channel you want to download and copy its link. Paste in into the software and choose if you want to save the playlist in MP3 or as video files. Don’t forget to select “Export to iTunes”.

Download Youtube Playlist


Now, when you have all the content you need, go to iTunes and synchronize it with your iPhone 5S or 5C.

Tips:

1) For those who download YouTube on a regular basis, it’s better use “one-click” download mode. Activate it in the top right corner of the software. Choose “Action” (download, convert to…), “Quality

(best, medium, low) and “Destination” folder.


Download Youtube Video

2) In case you have a slow Internet connection, you may limit download speed. Just click “speed” at the bottom of the software and choose the speed you need.


Author Bio:
This post is written by Selin Longhkaster from Freemake. She is fond of ice skating, technology, photography, music and writing for tech blogs.

How To Launch Parental Control On Different Platforms


Launch Parental Control On Different Platforms
With so many apps available for all mobile device platforms your children can find software solutions that can be really helpful in their everyday lives. There are a lot of educational applications that can help your kids in their school assignments, apps that can make it easy to always stay in touch with their parents or even some that can, for example, read them a story if your work prevents you from doing it yourself. On the other hand, many of those “useful” apps are a perfect bait for kids to spend money and do all sorts of expensive in-app purchases. You also can think of installing some tracking software like GPS handyortung to monitor your kid's location instantly.

A recent class act lawsuit against Apple that involved these in-app purchases made it clear that without proper monitoring, kids can make serious financial damage to their parents when they use mobile devices irresponsibly. Apple even paid 100 million dollars as a compensation for accidental purchases and started to use an "Offers In-App Purchases" disclaimer for these apps. This just proves you that irresponsible use of mobile devices by your kids can lead to serious financial and other consequences.
If you don’t want to be one of those parents that learned about responsibility in mobile phone use the hard way you should consider using a monitoring app for your children’s mobile devices. This way you can see and control all activities on a desired phone and act in time to stop all types of phone use you find inappropriate. Fortunately, monitoring software can be found for all mobile phone platforms and installing it will only take a few minutes of your time. Here are some guides on how to implement these monitoring apps.


Apple:

Apple makes it possible to restrict all in-app purchases for apps used on their devices.

To do this simply follow the below steps,
  • Go to your device Settings menu.
  • Then click General and then Restrictions.
  • Click on Enable Restrictions.
  • After that you can choose a PIN for changing these settings.
Keep in mind not to share this PIN with your kids. You can also make some other restrictions here like restricting your kid from listening to explicit music and more.

Further below you’ll find a In-App Purchases option which you can turn off, and make sure your kid will not make any unauthorized purchases. To change any of these options you can always come back and open this menu with the PIN you previously chose.


Recommended: Parental Tools For Keeping Your Child Safe Online.

Android:

In Google Play Store, used for buying apps on an Android phone, you can set up a password that has to be entered before making any type of purchase.

You also have an option to filter content shown in Play Store so you can make it show content rated for Everyone, Low Maturity, Medium Maturity and so on. If you use the phone yourself then you don’t have to change these options but if you share it with your kid, or if the phone in question is the one you kid uses then you should definitely use purchase password and content filtering.

Kindle:

Kindle devices have a very useful preinstalled app called FreeTime. You can use it to create accounts for your kids and choose the content they will be able to access. This great feature can also let you define how much time your child can use certain content or apps, so if you want to limit them to play one hour of games daily this is a great way to do it.

You can also subscribe to a FreeTime Unlimited service that offer content based on your child’s age. This way you can be sure that all the games, books and other content available to your child is appropriate for them. To get out of the FreeTime mode and use the device regularly you have to enter a password.

Nook:

Barnes & Noble readers and tablets will offer in-app purchase services in the future, so they still didn't announce any details about parental controls for this service. For now, you can create a user profile for your kid and choose the content he or she can access. They allow you to limit their access to Nook store and internet browser.

Windows 8

Windows 8 enables you to set up a profile for your children called Kids Corner and choose content they can or cannot access and things they can do with the device. For some apps like music players Kids Corner will automatically filter content that is inappropriate for your kids and stop them from accessing it. For the time being Kids Corner lets you set up only one user profile.

Image Credit: David .

Guide For Repairing Some Common Computer Problems


Repairing computers involves appropriate knowledge of composition and software. However, certain concerns can be solved by the user himself if he knows the right process. Understanding of the basics is an essential aspect since dependence on computers has increased immensely these days. Those who cannot do without a computer can save time and money through thorough study. Below are few problems with better solutions that a person must consider whenever he faces any issues.


1) Problem: System Freezing!

System freezing is a common problem that occurs due to faults in software or hardware. Therefore, one must be able to diagnose the problem properly. Such issues either emerge when the user attaches peripherals like scanner, printer etc. or due to driver conflicts. If one finds that the hard drive is the cause behind it, then it is definitely due to excessive heat or insufficient power supply. The solution to this problem is:


  1. The computer should be turned off for a few minutes and then plugged in again. This allows resetting the hardware and clearing the memory.
  2. If the system gets too hot, then one might have to open the computer. The user must first unplug the system and then open it.
  3. After opening the system, one must check the temperature of a component called metal chassis. Also, one must test the fans on rear and front side and ensure that there is no dust at all. One can use a clean cotton cloth for this purpose.
  4. If an additional hard drive has been installed in the system, one must avoid placing them adjacent to each other. This can lead to heating issues. If one desires extra storage, the hard drive should be installed in slots which have DVD or CD ROM drives. Also, one can opt for mounting brackets.
  5. After completing the work, one should always check the cable connections and close the cabinet without exerting much pressure as this might damage the motherboard.
  6. There are situations where system downloads a wrong driver during the Windows update process. This is why it is essential to monitor the status on regularly. After checking everything, one must switch the system on and check it is working fine. If the problem continues, it is advised to restore the computer to the previous configuration which might be helpful.
  7. The process of restoring is: Start option- Programs- Click on accessories- Choose system tools- Click on restore. This will restore all the settings that one has changed.
  8. It is also recommended to check the hard disk since over time it gets cluttered. This has a direct impact on the speed. The bad programs must be eliminated to get enhanced performance.

2) Problem: Loading Program and Applications!

There are instances when a program or application does not load properly. This is termed as the Blue Screen of Death. One must always delete such programs and scan the system with a reliable anti-virus.

3) Problem: Errors in Registry!

All the information related to settings of software as well as hardware is stored in the Windows Registry. Sometimes, the Registry is corrupted due to harmful programs. This can be solved in two ways; either by editing Registry or manually. You can also download PC Optimization software to do it for you. Or hire an expert in this and must always take back up before taking any action.

Image Credit: debspoons.


Author Bio:
The author works for www.axisdigitalworld.com and is an expert in computer repair Canberra. He can solve all kinds of computer problems within a short time span. Those who are not able to repair the systems can contact him and get the issue solved.

How to Convert PDF to Word for Free

The two most popular file formats used on a regular basis in the digital world are probably the PDF format and the Microsoft Word format. They are used in the office, at school and at home by just about every computer user for a large variety of purposes.

PDFs are used because they are universal and compact. This is what makes them great for sending information between people. However, they are hard to edit, which is one of their main downfalls. MS Word files, however, are easily editable. When people receive information as a PDF and they want to edit the information, converting the file into an MS Word file is one of the quickest and easiest ways to do so.

Thankfully, there are some great online converters that can take care of this for you - one is Convert PDF to Word. This online tool is completely free to use and it gives you high-quality conversions that maintain the form and structure of your PDF when converting it into a Word file.

The conversion can be performed with this online tool in three easy steps, with no need to download any type of desktop software.

1. Click “Browse” to select the PDF you want to convert.


2. Enter your email address.


3. Click “Send”.

A link for downloading your newly converted MS Word file will be sent to your email address.


It’s very reliable and quick, and of course, it is completely free. Anyone who needs to perform a quick and accurate conversion from PDF to Word should definitely try out Convert PDF to Word as a highly recommended free online option.

I Want Super-Fast Broadband - Can I Get It?


Super-Fast Broadband with fiber optic cable
Fiber optic broadband is sometimes classified as super-fast broadband. It’s the fastest broadband available to residential consumers and is an incredible service for most. Fiber optic broadband does come in different package speeds. In this article, we’ll look at whether you can get it in your home and the speeds attainable through some different providers.

The Speeds of Fiber Optic Broadband:

Super-fast fiber optic broadband is up 100Mpbs for residential consumers. Virgin Broadband offers incredible speeds that can be enough to do the highest intensity activities and for multiple people to engage with the internet at the same time. With the slowest connections, you tend to get up to 24Mbps or up to 38Mbps as with Sky Broadband. These connections still are very fast considering the fact that you get almost the speed that is advertised.

ADSL Broadband:

With ADSL Broadband you only get a fraction of the speed advertised in some cases. This is because the copper cables of the BT infrastructure are not very good at allowing the internet data to pass and therefore there are bottlenecks and slowdowns along the journey. With fiber optic cables they are optimal for internet transfer. Therefore you get close to your advertised speed especially on fiber-to-the-home offerings.

Fiber-to-the-home is where the entire internet journey is over the fiber optic cables. With fiber-to-the-cabinet, the final leg of the journey is over copper cables of the BT infrastructure. Therefore, with fiber-to-the-cabinet you tend to lose a bit more speed.

How important is speed?

Speed of broadband is crucial to many of the activities you do. If you’re looking to do high definition movie streaming, you may need 5Mbps connections. Indeed, with standard definition movies you may well need between 0.5Mbps and 2Mbps otherwise you’ll end up waiting around while the connection buffers the stream and you may even end up with breaks in your connection during a movie or a video event. It’s important therefore that you have enough download speed to handle the challenges.

Have a look at: Factors That Affect Your Broadband Speed.

What about upload speed?

With upload speed you can be seriously impacted if you haven’t got enough. If you are sending photos to Facebook and there are pretty large files, you could end up waiting for ten minutes for them to upload and not know whether it’s actually progressing or not.

Indeed, if you’re uploading large files to a web server or to Google docs again you could wait for hours and hours. Upload speed tends to be much lower than download speeds. If you have an up to 16Mbps download speed you may only have 1Mbps upload speed. Indeed, with performance issues you may even get much lower speed on upload than this. This can mean waiting around for hours and hours.

Business connections can have symmetric connections, for example, symmetric DSL, SDSL, as opposed to ADSL. With symmetric connections you have the same upload speed and download speed meaning that you can do the things that you want to do upstream just as fast as you want those that you want to do downstream. This is a great benefit for businesses that spend more time sending data than receiving it.

Of course, as residential broadband consumers, we do spend more time browsing, downloading, and generally interacting with data that’s coming to us than sending data away. However, it’s important for you understand your particular activity so you ensure that you get the upload speed that you require.

Latency and Ping Speeds:

Latency or ping is the amount of time it takes to get response from the server. It isn’t the speed of data transfer; it is the speed of response. The ping speed is important for certain activities such as multiplayer gaming, online video chat, and even sometimes video streaming. If you have poor latency speeds you can end up with a jittery and generally poor quality performance of certain activities. It’s therefore important that you have a good ping speed.

This is somewhere that fiber optic broadband can fall down. The fiber optic cables aren’t always the best at getting the best ping rates and where you may get 35milliseconds on ADSL, you may get double or more this on fiber optic broadband. It’s important to consider this when you’re looking at the activities you want to do and it may be that you want to choose an ADSL connection if you are looking to do certain activities.

Can I get fiber optic broadband?

Many of us are wondering whether we can get fiber optic broadband in our area or not. The cables are being run all the time and it may have changed since we last checked. The best way to check is to do a post code search. If you search online for "Can I get fibre optic broadband?" you’ll get a number of search results offering you tools to find out. All you have to do is pop in your postcode and you’ll be shown the providers that are servicing your area.

If they are servicing your area, you’ll also probably be able to see the package details, costs, speeds, and so on. 
You can then look at the small print, fair usage policies and traffic management to decide whether a particular deal is for you. For users residing in UK Talktalk broadband offers a lot of services for a very less amount.

It’s also well worth looking at the speed test results that people have done in your area.


Have a look at: Free Softwares To Increase Your Internet Speed.

Speed Test Results:

Whenever someone does a speed test on their connection, they are normally provided with the opportunity to share their results. These results go into the back end of a system where you can search on a map and find out what connection speeds different providers are attaining in your neighbourhood. This is a great way to see actual speeds of fiber optic and ADSL broadband without having to rely on advertised speeds.

Generally, fiber optic broadband gets very close to the advertised level. However, we’ve seen that Virgin Broadband are best on this measure and sometimes you may get 10Mbps slower if you are a long way from the cabinet or if you have a poor infrastructure in your home. It’s therefore really crucial that you do a variety of tests to ensure that you get the best broadband connection available to you.

Do also consider your usage profile to ensure that you manage to get a connection that is appropriate and not superfluous to your requirements. You just end up wasting money if you get an unlimited top level connection and you don’t end up using your broadband for doing anything other than browsing and checking e-mail.


Image Credit: pakorn.


Author Bio:
Sam Jones’s son wanted to make sure his fiber optic broadband was working at its maximum potential. Sites like uSwitch told him how he could do this and saved him a lot of time.

Learn How To Create YouTube Videos With These Three Tips For Beginners

how to create youtube video?
YouTube is one of the leading video sharing sites on the Internet where you can find all types of videos from individuals and businesses. Many people post videos for fun. They simply want to share something they thought was funny or inspirational with others. Businesses use it to promote their products and services, so you can find a video for just about anything you can imagine on YouTube.
While creating and positing a video in YouTube is fairly easy, you do want to make sure you create something that others will watch. You don’t want to stick just anything on there, especially if you’re promoting your company. Here are three very important things to remember and apply when creating YouTube Videos.


Create Your Own Keywords and Tags:

This can be a very difficult part of making videos for some people but it is a necessary one. In order for viewers to find your video, you need good keywords and tags. You can check out the competition to give you some ideas but remember you never want to copy keywords and tags from someone else. This could ruin your reputation. Instead, use your imagination and come up with keywords and tags that describe the content of your video the best. You can also use a keyword tool designed to help you come up with good ideas.

Find Your Own Style and Voice:

When creating any video, it’s important to find your own style and voice. When you watch YouTube videos, you’ll notice that the creators of the successful ones have their own style and they have no doubt worked hard to find a system that works great for them. You’ll have to do the same and it will probably be a trial and error phrase while you search for your own style and voice that helps to make your videos successful. The main thing to remember is to relax, be yourself and don’t give up. You’ll soon find the style that suits you the best.

Only Post Videos That You Are Passionate About:

This is very important because if you’re not passionate about the subject in your video, the viewers will be able to tell and if you’re not really interested in your own video, why should they be? Many people create videos just for the views and while you do want to attract as many viewers as possible, this shouldn’t be your only reason for creating a video.

Instead, the video should have meaning. They can provide viewers with important and useful information, tell a story or simply make people laugh but they should have a real purpose. When you create videos that you are truly passionate about, it will show in your work and this will help to draw in more viewers. People will want to share them with others and they’ll look for more videos you’ve created. Once you have created your video, you can buy YouTube views to help boost ratings and get people interested but it’s the content that will keep them coming back and sharing with others.

Creating your own keywords and tags, finding your own style and only creating videos that you are passionate about will help you create YouTube videos that people will want to watch.


When you are ready to go on and create your own video, You have just got promoted to this article "Making Money With YouTube" So have a look at it too :)

Image Credit: MyBlogGuest platform.


Author Bio:
Brittany Clark likes to help others learn more about YouTube by writing articles and blog posts on the topic. She’s also a big fan of using YouTube for business.

How to Save a Wet Cell Phone?


Chances are, you or someone you know has dropped their cell phone in water. It’s that moment when everything turns into slow motion, as your lifeline to social media, friends and family slowly succumbs to a watery death. But is there a way to rescue your cell phone once it’s taken the plunge? Keep reading and check out this infographic ,"How to Save a Wet Cell Phone".

With over 80% of the population using cell phones in the United States, it’s no surprise that many have lost a phone to water. Over 116,000 cell phones end up in the laundry each year, and over 850,000 end up in a toilet! There’s even a Facebook group dedicated to those poor souls that have lost a cell phone during a trip to the bathroom. 29% of cellphone users admit that their damage was caused by spilling a drink on them, and it’s no surprise that men are three times as likely to damage their phone via water!

Have a Look At: Saving Your Smart Phone When It Falls In The Toilet!


Once you’ve rescued your phone from the H2O, it’s time to act-and act quickly. First, turn off the device-if it’s off already, don’t turn it on! Dry it off, and take it apart-including sim cards and the battery. Don’t shake or jostle the phone too much, as this can force water into delicate parts of the device. If spray alcohol is available, spraying the inside may help disperse the water. Use a small vacuum to help suck out any water, and then immediately put the phone into a bag of rice. You can also purchase a first-aid kit from Dry-All to help save your cell phone. Whatever you do, do not put your phone in the microwave, take a hair dryer to it, or place the device on a heater.


Feel free to like, comment, and share this, “How to Save a Wet Cell Phone” infographic from Partselect.com!


Source: Partselect.

10 Easy Steps To Configuring An Internet Answering Machine

Configuring Internet Answering Machine
An online answering machine works just like a regular answering device. The only divergence is that you have to connect your phone to the computer instead of a traditional answering device. The online answering works on both dial-up and broadband connections and ensures that you do not miss any call. The answering software allows you to listen to messages as and when they are being recorded, and also download other messages and listen to them much later.

Here are step-by-step instructions that will help you install and setup online answering software:

  1. Before downloading and installing the software, do check if your computer has the necessary space and memory, and the appropriate modem. You will need a voice modem – space and memory should not be a constraint.
  2. Before buying any software, download the trial version and test it. It must be easy to use and you should take a liking to it before buying it. Most answering software companies offer a free trial, and you should try 3-4 different software before zeroing on to one.
  3. After choosing convenient answering software, you should buy and download it. Save the exe file in a folder of your choice.
  4. Remove the line cord from your telephone and connect it to the modem port in your computer. The other end should be plugged into the wall jack. Connect the telephone line to your modem. If you need clarity on this step, talk to customer support of the online answering software vendor.
  5. Now, install the answering software. Install it as recommended in its manual or as per directions printed on the installation screens.
  6. You have to now configure the software based on your preferences – For example: set the number of rings that should be allowed before the software answers the phone, set the silence detector and the toll saver features. You also should configure the recording time limit for messages. Check all the other features in the software and set them up as per your requirements.
  7. Next, set up one or many mailboxes to record a greeting message. You can record multiple messages – one each for every mailbox. Many software tools have a feature that allows you to record a special greeting for a few phone numbers of your choice.
  8. To stop unauthorized people from accessing your messages, you must setup a password. Note down the password in your diary. Remember, you can even access your messages remotely.
  9. If you are the type of guy who gets very important messages all the time, then you should enable email forwarding of messages. That way every message will be forwarded to your email inbox.
  10. If you want to be alerted every time a new message rolls in, then you have to configure the appropriate alert option.

Finally, do not install an Internet answering machine without equipping your computer with a robust firewall and antivirus programs. You don’t want people hacking into your computer and stealing your precious data, including the important messages in your mailboxes.


Author Bio:
Roger A. Delatorre is a blogger from Minneapolis, MN who recommends checking out MaxEmail for a simple solution for an internet answering machine.

Exactly How To Construct Your Own Computer On A Budget?


How To Construct Your Own Computer On A Budget?

If you know how to built a laptop computer yourself, you'll be able to save cash compared to buying a prebuilt PC.If you are new to computer putting your unit together and you are not sure if you possibly can do it then do not worry as you will find numbers of tutees online to educate you precisely how.

Building your computer is absolutely not as hard as much people imagine, and once you have successfully built your first computer you will realize just how easy it can be. One way in lowering the cost of your new computer is to choose a motherboard that has integrated sound, networking together with video as this can reduce three of the most common components within a PC.

Keep in mind that you are building a pc on some sort of budget, while this integrated video will more than likely not be ready to play the hottest and very best games that are out, it would usually work just fine for web site surfing and additionally office programs. You should expect your cost to remain more if you're trying to develop a playing games computer as investing in good online video card with regard to gaming is usually expensive. Just check out for your Control board for LaserJet.

Another tip on creating a computer for a budget and saving money is to help you exclude choosing a new oven floppy drive since several all programs including os's are now on a DVD/CD and additionally floppy drives are becoming obsolete. Although floppy drives are fairly cheap at this point, every little bit helps when you are trying to avoid wasting money. By focusing on how these few tips about building your personal computer on a budget, you are able to save a bundle and reduce the quantity of hardware that you have got to order. Just check out for your fuser cooling fan.

With all of this being said, one more aspect to consider is with certainty if you receive an existing pc used parts from which include, you keep an eye on keyboard and mouse, which methods you could probably have an exciting new custom built computer which you could easily create yourself, for a tiny amount of money.

The only real downside to using discuss compression with regard to internal PC hardware cleaning is, pc humidity and temperature, varying examples of water can be found in the compressed air. The simple solution to the present problem is always to attach a particular in line dryer/filter with a desiccant that removes water, dirt and petroleum vapor. Ensuring thoroughly clean and dry permit suitable meant for internal appliance cleaning.


Author Bio:
Kamal Ahmad Is young entrepreneur who love to write on tech gadget. And believe on green technology, he has the view that its every person’s responsibility to take part in saving earth by promoting green tech. He blogs on http://yourpcuniverse.com and tweets @YourPcUniverse

Here's Exactly How To Use Your Phone To Book Your Next Vacation


Booking your next vacation may take a lot of time to complete, especially if you’re the busy kind of person. Chances are you will be seeking the help of a travel agent to furnish your trip based on your preferences instead, as you don’t have the time to work on it on your own.

But what if you’re not into coordinating with an agent to furnish your travel needs? Well, you can still do things on your own, but this time you will need an assistant-your phone.

There are many ways in which you can use your phone to book your next vacation. And yes, it is capable of doing the job right, so you don’t have to worry a bit. Here’s a step-by-step guide that you can follow:

Step 1: Download a travel app.

Mobile travel apps are rampant nowadays, and if you’re working on your vacation plans then you should get a travel app on your phone right away. There are many travel apps that you can check out depending on your preparation needs. There’s the TripAdvisor app which allows you to browse on different hotels in the destinations you intend to visit, as well as user reviews that can help you choose the best hotel to book at.

There are also other travel apps that provide you with full packaged tour deals which include hotels, itineraries and mode of transport. You may want to take advantage of these too as they cut the time you have to spend working on your vacation needs.

Step 2: Start booking.

When you use the apps you’ve downloaded, you may want to proceed with booking right on your phone after making your choices. You can book reservations right on these apps, as most of them are already integrated with booking sites that can process your orders.

Booking also depends on the app you’re using. For apps that cater to hotels only, then you can proceed with making a reservation through them on your phone. You will then be guided to a customer service representative who will take charge of confirming your order and create a reservation that would be ready for use once paid.

You don’t have to pay upfront when making a reservation. Some reservations are open for a week or so, until you decide to confirm, change the dates or cancel it. The important thing is you already have a template to follow or use for your travel plans.

Step 3: Check for the nearby amenities.

Before you actually pay your reservation, you may want to look at the available attractions, amenities and highlights in your chosen destination. These include the parks, museums, nearby beaches and other tourist landmarks that you will enjoy checking out. You can do this right on your smartphone using other apps, or via Wikipedia.

Doing this is very important because you are given a better picture of what to expect from your vacation; you cannot just rely on your friend's pictures and feedback in case they’ve been to the places you want to visit otherwise you might end up regretting your holiday in the long run.

For example, if you are planning to visit New England and would want to exercise your gambling skills, you may want to look for a nearby casino Connecticut is famous for or Vermont. You may not book a reservation in these establishments, but you can visit them to play your favorite games during the course of your vacation.

Step 4: Confirm and pay.

Once you have finalized your reservations, your chosen hotels and itineraries, airfares and even the choice of amenities you’d like to check out, then you can go ahead and confirm your bookings. There are many travel apps these days that allow you to make orders and pay for your purchases right on your own phone.

Some apps would redirect you to their affiliate companies that will take charge of securing your payment. Most online payments are completed using credit cards such as Visa or MasterCard, so you should prepare your cards when securing your reservations. Some on the other hand prefer online payment systems, such as PayPal, as these are more convenient in terms of processing.

Step 5: Tally your itinerary.

Finally, when everything’s secured and paid for, it’s time for you to tally your itinerary right on your phone. There are apps that allow you to do this, such as TripIt. These apps prepare your travel plan based on your purchased packages, and once you’re on your trip you kept from being lost from your intended travel activities.

Travel organizer apps help a lot in keeping you on track during your vacation. Sure, they can be a bit OC, but they give you the advantage of maxing out the limited time you have on your holiday. You can only do as much during your vacation, thus you’d have to make the most of it.

A few more vacation planning tips

When planning out your next vacation, think about this: what do you want to do during your time away from home? This will give you the foundations of the kind of vacation to get, no matter how silly it would seem to be for some. But the bottom line is, if it’s how you want to spend your vacation, then by all means-go for it.

Also, when planning your vacation, you should do it at the right timing. You may want to settle at a time when tourists are not flocking vacation hotspots, as the rates of hotels, tours and transport are relatively much cheaper. You can also score discounted deals that would allow you to save more money in the long run.

Lastly, plan your trip early. Early birds always get the best deals. If you do your travel planning ahead of time, you are able to look at more choices, even if you intend to go during the peak season. Early planning also gives more time to gather your resources and save more money for travel expenses until your departure date comes.


Author Bio:
Bill Powers is a freelance writer who loves to write about vacations, traveling and exotic locations. He also writes for Foxwoods Resort; follow them on Twitter and Facebook.

Saving Your Smart Phone When It Falls In The Toilet


You walk into the bathroom, your bladder is throbbing. You throw open the lid of the toilet, bend down, and before you have time to react you’re new iPhone 5 has fallen from your jacket and floats in a new resting place in the toilet bowl. Suddenly, relieving yourself has taken a backseat to retrieving and attempting to salvage your phone. Regardless of the brand and model of smartphone, the urgency to save your expensive technology is the same. The next time you find yourself in this unfortunate situation, keep in mind the following tips to rescue and resuscitate your fallen phone.

Recommended for you: How to Save a Wet Cell Phone?

Extract the Phone Immediately:

This should probably just go without saying since your instinctive reaction will likely be to thrust your hand into the toilet bowl and pull the phone out. If you already relieved yourself when the phone fell, your unfortunate situation just got a little more unfortunate -- and interesting. The plastic on most smart phones is pretty tight, but you should assume it is waterlogged and make haste to pull it out.

Remove the Battery and Place on a Towel:

How long the phone was immersed in water will determine the damage. Sometimes if the phone was not in the water for too long, there will not be much damage. Instead of immediately patting the phone dry after taking it out, remove the battery cover and battery and place them on the towel.

This is essential to preserving the function of the phone since many electrical circuits in the phone will still function after immersion in water if they are unattached to a power source. You should also remove any covers or accessories from the phone. Taking out the SIM card is also a good idea since all of your contact data is stored here.

Dry the Phone Well:

Even a little bit of water still inside the phone can ruin it. Damaging the circuitry and corroding other essential components is possible with the presence of just a little water. Keep the phone still on a flat surface and gently wipe it with an absorbent cloth or towel. Try not to shake or move the phone around too much since this could spread water around inside. Often this is the last step to resolving the crisis. Once dry, turn the phone on and see if it works.

Vacuum Dry:

This is an additional step that may not be necessary after towel drying. Holding a vacuum cleaner suction tube over the phone to remove residual moisture can effectively dry your phone in a short time. Always hold the vacuum away from the phone to prevent static electricity from building up. After vacuuming, wait a couple of hours to turn your phone on, even if it appears dry. This will ensure proper evaporation of all of the components of the phone to prevent an electrical short.

Test the Phone:

After drying your phone using whatever means you have available, the final step is to turn the phone on and test it. Waiting until the phone is completely dried out is a good idea before turning it on. Of course, if the phone doesn’t even turn on, you’ve completed the test and it has failed -- you either need a new battery, a charge, or need to consult a professional. Check the ports and crevasses for moisture, insert the battery, and power it on. Ensure the phone functions and that there are no strange noises. If all appears well, you’ve learned a valuable lesson and still have a functioning phone.


Author Bio:
Ben Vaughn is a contributing writer for ACR Services. He writes on topics ranging from choosing a plumber and water conservation tips to saving your smartphone from a slow drowning death in the toilet.

How To Replace Laptop Accessories


There are a lot of important laptop accessories that can improve the whole function of a laptop. In some cases, these accessories should be replaced with the new one. It is very important for people to learn how to replace the laptop accessories in the correct way. This is very vital to avoid any problems or damages on the laptop in the future. In this article, there are several popular accessories and how to replace them with the new one. These accessories are chosen because they are very popular among all computer users. Almost all users have these laptop accessories.

1). Laptop keyboard cover:


This accessory is very popular because it can improve the protection on the laptop. There are a lot of different styles and models of this laptop keyboard cover. Most products are specially designed in order to prevent any scratches or damages on the original laptop keyboard. In some cases, this keyboard cover should be replaced with the new one. This product can tear because of the intensive or excessive use. People can simply open the keyboard cover before replacing it with the new one. However, they have to be very careful when opening this cover. Then, they have to purchase a new keyboard cover. They have to measure the keyboard size before purchasing the new keyboard cover. People can simply attach the new keyboard cover to their laptop keyboard. It is necessary to avoid the use of any water because water can damage the laptop.

2). Laptop power jack:


Laptop power jack is an important part in a laptop. This accessory is very useful to conduct the electricity for the laptop. This power jack is very fragile. It can break off very easily. When this situation happen, people should open their laptop in order to replace the broken power jack with the new one. First, they have to remove the battery back from the laptop. It is vital to unplug the power cord on the wall outlet. Then all screws should be unscrewed in order to open the laptop before removing the hard drive of the laptop. There is a laptop power jack inside the laptop body. This accessory is usually located on the motherboard. Replace the broken power jack with the new one. After replacing it with the new power jack, people can simply put all parts, including the motherboard, hard drive, battery, and any other laptop parts, back to the original condition.

3). Laptop batteries:


Laptop battery is another important part in a laptop. There are many problems that may occur in most laptop batteries. Most batteries can last for at least one year before getting any problems. When people have any problems with their batteries, they should replace them in the correct way. Replacing a laptop battery is not as complicated as what people thought. People can simply remove the old battery with the new one. It is very simple to remove the battery from a laptop. In some laptop models, people can simply press the release button to remove the battery easily.

How To Boot Ubuntu From A USB Flash Drive

Below are the three methods, that can be adopted to boot Ubuntu OS from a USB Flash Drive!

Option 1: Boot Ubuntu as a Live CD from a USB Flash Drive

Use this option to install Ubuntu as a Live Install, which allows you to boot from the USB flash drive in Ubuntu, experience the Linux environment but will not retain any changes or settings after you shut down. This is a great way to get a feel for the OS, test some of it's capabilities as well as typical hardware compatibility.

Programs you may need to download:
  1. Ubuntu 10.04 Live CD ISO available at ubuntu.com.
  2. Universal USB Installer available at pendrivelinux.com.

What you will need:
  1. Computer Running Windows XP/Vista/7.
  2. Fat32 Formatted USB 2.0 Flash Drive, at least 1GB.
  3. PC with a Bios that can boot from USB.

Now with all of the necessary components in place, we can begin to setup our Ubuntu Live USB Drive,
  1. Run the Universal USB Installer by Pendrivelinux.com that you downloaded earlier.
  2. Choose Ubuntu 9.10/10.04.1 Desktop i386.
  3. Select the Ubuntu Live CD that you downloaded earlier.
  4. Choose your Flash Drive.
  5. In this instance, we are going leave the persistence option unchecked.

This can take anywhere from 15 minutes to 30 minutes depending on the speed of your system. At one point the progress bar will freeze until it is done, and this is the lengthiest wait of the process.

Once complete, you can reboot your computer with the USB flash drive in the USB port, press F12 for the Boot Menu and choose the removable media to boot from and you are in.

As this is a Live USB, any changes you make to the Ubuntu environment will not persist through a reboot. This is because running in this mode, Ubuntu uses available RAM in place of Swap and Hard Disk space. This option also contains the install files needed to install Ubuntu directly to your desktop if you should so desire.


Option 2: Boot Ubuntu as a Live CD with Persistence from a USB Flash Drive

This option will install Ubuntu Linux onto your flash drive with an area for persistent storage. You will be able to restart the computer, boot back into the Linux environment and all settings or changes made previously will persist.

Note: This option is particularly hard on Flash Memory, as there can be quite a bit of reading and writing to the Flash Memory.

What you will need:
  1. Computer Running Windows XP/Vista/7.
  2. Fat32 Formatted USB 2.0 Flash Drive, at least 2GB.
  3. PC with a Bios that can boot from USB.

Now with all of the necessary components in place, we can begin to setup our Ubuntu Live USB Drive,
  1. Run the Universal USB Installer by Pendrivelinux.com that you downloaded earlier.
  2. Choose Ubuntu 9.10/10.04.1 Desktop i386.
  3. Select the Ubuntu Live CD that you downloaded earlier.
  4. Choose your Flash Drive.
  5. Select the Persistence Option of 1GB Casper-RW.

This can take anywhere from 15 minutes to 30 minutes depending on the speed of your system. At one point the progress bar will freeze until it is done, and this is the lengthiest wait of the process.

Once complete, you can reboot your computer with the USB flash drive in the USB port, press F12 for the Boot Menu and choose the removable media to boot from and you are in.

As this is a Live USB with Persistence, any changes you make to the Ubuntu environment will keep through a reboot. This option also contains the install files needed to install Ubuntu directly to your desktop if you should so desire.


Option 3: Install Ubuntu directly to a USB flash Drive

This option works through installing Ubuntu to the flash drive as a complete installation. It does not retain the installation files to install on another system. This will allow you to use Ubuntu exactly as if it were installed alone on the hard disk. You can boot from it with any computer that can boot from a USB flash drive.

Note: This method requires that you disable your hard drive in BIOS to prevent overwriting your current operating system and force the install onto the USB drive.

What you will need:
  1. USB 2.0 Flash Drive, at least 4GB.
  2. PC with a BIOS that can boot from USB.
  3. Blank CD.
  4. A Computer with the ability to Burn CD/DVD.

Now with all of the necessary components in place, we can begin the process,
  1. First, you will need to burn your Ubuntu ISO to CD using a program like ImgBurn available at ImgBurn.com.
  2. Boot your computer and press F2 to enter the system BIOS. Within here you will want to disable your Hard Drive. If this is not an option in your BIOS, I would suggest shutting down your computer and unplugging the power and data cables from your hard drive before proceeding. Note: If you choose not to disable your hard drive, you run the risk of installing Ubuntu on top of your current OS and can lose valuable information.
  3. After you have disabled your hard drive, place the Ubuntu Live CD into your computer and boot from this.
  4. At the initial boot screen, choose to try Ubuntu, not install.
  5. Once Ubuntu loads, plug in the desired flash drive into the computer.
  6. Now, double click on the Install Ubuntu icon that appears on the desktop.
  7. The first 3 screens are language, time zone, and keyboard layout.
  8. Now Ubuntu will notify you that there is a disk mounted, and asks to unmount it. This is your flash drive. Give it permission to unmount.
  9. This is the prepare disk space screen. I chose to leave mine at default and let the installer handle the partitions needed by Linux.
  10. Now you will see the login and user information screen.
  11. Now you are ready to install, click install.
  12. At one point during the installation, you may notice a skip button appear on the bottom left. This is to skip the auto update, and finally the language packs. I chose to skip language packs update.
  13. This may take a while, mine took atbout 35 minutes to complete. When it is done, eject the disk and shut down the computer. Plug your hard drive back in if necessary, or boot your computer into bios and re-enable it. Reboot your computer and press F12 to enter the boot menu, choose the flash drive and boot into Ubuntu.


Author Bio:
Joshua Bulman is a full time web designer and IT support technician for a company that provides Custom USB drives via the web marketplace. He enjoys reading fiction, writing just about anything, and discovering new technologies.