Expand Widget Templates in new Blogger HTML Template Editor

Today I am sharing a useful post that all of Blogger Bloggers searching in Blogger New HTML Editor.
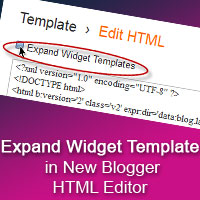
In old HTML Editor, there is an option "Expand Widget Templates".
By default while editing HTML code, Blogger shows only core of template and not shows the Blogger Widget codes. To see the full template code you have to select the option "Expand Widget Templates"
This option is very useful to add new features or additional features inside specific widgets in Blogger template.
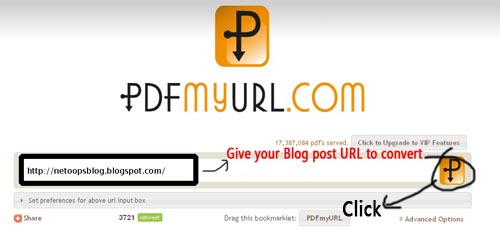
Here I am going to show you how to do in new Blogger HTML Editor.


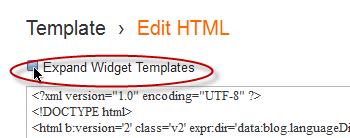
This is the option in old Blogger Template.
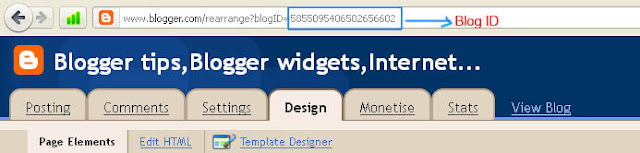
The new Blogger Template looks like the following.


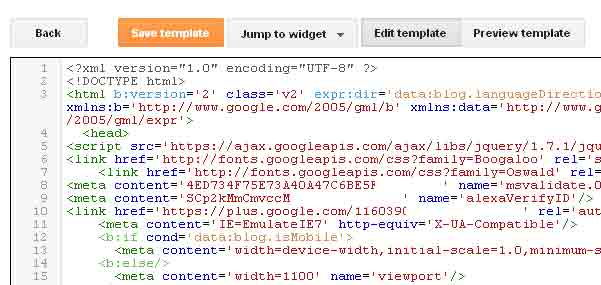
You can't expand all widgets simultaneously. You have to expand each Widgets by clicking the right arrows as shown below.


Also you can expand the code of specific widget, take "Jump to widget" from the drop down box take the appropriate widget to see the code.
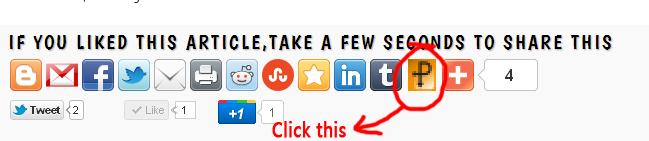
I think this article will help you not a lot but a little, if so please take a few seconds to share this article..

How to Backup/Restore template in new blogger interface?

Backup restore new Blogger Template easily
Here i'm saying about an important topic that i had posted early " How to Backup/Restore Blogger Template? ". But i'm going to show you How to Backup/Restore  Blogger Template in New Blogger Template . Now a days Blogger default interface is Upgraded New Blogger Interface. Backup/Restore Template is so important,So don't take this as a silly matter.
Read Following see How to backup template in New Blogger Interface..


How to Backup/Restore Template

  • Go to Blogger Account
  • Select Template [as shown in fig.]
Backup restore new Blogger Template easilyBackup restore new Blogger Template easily
  • Click on the Button Backup/Restore  in Left top .
  •  A box appears [as shown in fig.]

Backup restore new Blogger Template easily
  • As shown in the above fig. 
  • Click on Download Full Template to download Template.Save it
  • Click on the Browse to Restore the early downloaded Template.
  • That's all ..Enjoy with us...


Check out other Blogger Tricks HERE and Blogger jquery Widget Generators HERE

How to Disable lightbox in blogger

disable lightbox in blogger
Blogger also provides lightbox for viewing images.But if you take one image,it will open and the whole pictures in the page are listed ,Sometimes it may be a good feature also a bad feature.Here is a Simple trick to disable lightbox in blogger.


  • Go to Settings->Formatting (as shown in figure)
  •  You see a Option Showcase images with Lightbox select No.
  • That all.No longer Light box appear in your blog.

Convert Blog Posts to PDF file in Blogger Blog

pdf blog post
Here is a post that helps you to easily convert the Blog posts/Blog/Website to a Pdf file.So you can easily refer that Blog Post without the connection of Internet.

Follow the Instructions Below


How to convert Blog post to PDF

  •  Then Click the button P on the left side
  • That's all.You will get the PDF file.

Get PDF file of Blog post in this Blog.

  • Simply open the Blog post you want to Convert.
  • At the end of post there are some sharing buttons (Please share via Facebook,Twitter,etc) ,you will see an icon  P that like you found on the http://pdfmyurl.com,(Shown in below Fig.)  Click it
blog post to pdf

  • You will get the PDF file of that post.
I hope you had enjoyed this post....Please Share this

    Stylish Google friend connect Button to Increase followers

    Google Friend Connect
    Google Friend Connect is an awesome Tool that lets your visitors to Follow your Blog and Increase your Blog Rank,gets Higher Traffic.

    Here I am saying about how to add a Standalone Google Friend connect Button or Link to Your Blog/Page or anywhere in your Blog.

    This Google Friend Connect Widget can only be place at Widget.This Standalone Friend connect button can place at anywhere also in the Post.

    Follow the instructions below.

    Add Follow button with Text

    <a href="http://www.blogger.com/follow-blog.g?blogID=PLACE YOUR BLOG ID HERE" target="_blank" title="Follow With Google Friend Connect"><img border="0" src="https://blogger.googleusercontent.com/img/b/R29vZ2xl/AVvXsEhXHYYR1l0sCohAQiwOWyWQWKEZHTbLG-EHwX7EfWI4ZY6WaRbwq6eONE6v2nmOoPtDElhcuGS0i4jj8UqAJuUezVDS33Fc3t980DHIorzgP0JQe2xsQzkJUJxh4R4CztjYE8vgRpTjhBA/s1600/google+friend+connect+netoops.jpg" /></a>
    Preview


    Add a Stylish Follow Button

    <a href="http://www.blogger.com/follow-blog.g?blogID=PLACE YOUR BLOG ID HERE" target="_blank" title="Follow With Google Friend Connect"><img border="0" src="https://blogger.googleusercontent.com/img/b/R29vZ2xl/AVvXsEiJkNT-WxPgkozrJN6XVSKSbmY6knoHC5rKlfrWdu4UZDWwV2g6OdM5XKCYK4iEPEWpmhVvEWw9nA3yMycLBD4o_UwJqh2JgDnvx2tjwaLGR5IlZu_feUomOPAtrvK1S0RnQRIHgXSDjG4/s1600/google+friend+connect+style.jpg" /></a>
    Preview

    Another Stylish Follow Button

    <a href="http://www.blogger.com/follow-blog.g?blogID=PLACE YOUR BLOG ID HERE" target="_blank" title="Follow With Google Friend Connect"><img border="0" src="https://blogger.googleusercontent.com/img/b/R29vZ2xl/AVvXsEi6__ZReq4ncT5GSGsuLtKfbzQEfE6DCZCQ9MkT2X5RnLcLeC_6j2lJOGatgw5j0qEhK53mmnUmXIV1Dew8NYDmSOHK5n-ZzA7YOnXNKLJnyKjyg7y0NiDyjpIJE5qimY4wdIAVhACmD64/s1600/google+friend+connect+style2+netoops.jpg" /></a>
    Preview

    Another Water Blue Stylish Follow Button

    <a href="http://www.blogger.com/follow-blog.g?blogID=PLACE YOUR BLOG ID HERE" target="_blank" title="Follow With Google Friend Connect"><img border="0" src="https://blogger.googleusercontent.com/img/b/R29vZ2xl/AVvXsEj1MB0kjgrF_FRIU3nBb_eAoSxIcVwH3-K8TfBAxKNyKnzKxlWwRBaJQK6LA2NEqsFBXqqF36peX2Y5oCEzu6YmT2cwfAjlGgMp7bD1O8Zt2WeNawdDE5LgTQ4O44kbGF5WgcefOP93C94/s1600/google+friend+connect+style3+netoops.jpg" /></a>
    Preview


    How to Find your Blogger ID

    • Simply Go to Design or Settings or Posting or any other of the TAB
    • Watch the URL on Address Bar of the Browser and copy the Blog ID number and replace "PLACE YOUR BLOG ID HERE" with your blog id .


    How to Add Follow Button Below Every Post.


    Remember that Backup your Template Before Editing (How to Backup Template)

    <div class='post-footer-line post-footer-line-1'>
    OR
    <p class='post-footer-line post-footer-line-1'>
    • Place the following code Before it
    <b:if cond='data:pageType == &quot;item&quot;'>
    PLACE THE CODE OF FOLLOW BUTTON YOU WANT (that described above)
    <.b:if>
    Example:
    <b:if cond='data:blog.url == &quot;item&quot;'>
    <a href="http://www.blogger.com/follow-blog.g?blogID=585509540650265660" target="_blank" title="Follow With Google Friend Connect"><img border="0" src="https://blogger.googleusercontent.com/img/b/R29vZ2xl/AVvXsEj1MB0kjgrF_FRIU3nBb_eAoSxIcVwH3-K8TfBAxKNyKnzKxlWwRBaJQK6LA2NEqsFBXqqF36peX2Y5oCEzu6YmT2cwfAjlGgMp7bD1O8Zt2WeNawdDE5LgTQ4O44kbGF5WgcefOP93C94/s1600/google+friend+connect+style3+netoops.jpg" /></a>
    <.b:if>
    • Save the Template..Done..
    I hope you enjoyed this Post ,If any bugs with this please Comment it....

    Create an Official Google plus Page to drive traffic

    Google launched Google pages for Google plus.It is a business solution for promoting products,blogs,news,events etc.. to your fans.Another important feature is it will increase your blog's traffic.Now i am saying about how to create an official Google+ Fan Page for your Blog.You can share your blog posts,events,photos etc to your Google Official plus fan page.It is almost similar to Facebook Fan Page.
    Lets see how to create it.(Description with images)
    Follow the instructions

    Create official Google+ page

    You must have a Google plus Account to create Fan page.

    • Sign In to your Google account and go to this LINK
    • Click on Product or Brand
    • Give the name of page you need to create(Blog/Site Name)
    • Choose Website from the list
    • Make sure you check the box below it
    • Click on CREATE

    •  The give your blog title and upload your Blog LOGO, If you have no LOGO for Blog click HERE
    • Click on Continue
    • Page creation is almost finished.Now you can share your Google+ page by click on Share on Google+
    • Click on finish ..Done..your page has been created sucessfully.

    How to add Google+ Badge to your Blog

    After finishing creating page ,you can see a button Get the Badge, Click it
    • It will redirect to the page like following picture.
    • you can see your page link,you can share it.
    • Choose the style of your G+ badge
    • After that if you want check the box HTML5 valid syntax
    • Then Copy the code in  the text box
    • Go to your Blogger Dashboard
    • Select Design->Page Elements click on Add Gadget
    • A pop up window will appear look it carefully and find HTML/JavaScript
    • Enter gadget title(eg:Share in Google Plus) and Paste the code on the content textbox
    • Click on SAVE..,Done..

    Remove Subscribe to posts (atom) from Blogger Blog


    #This is an article about how to remove Subscribe to:posts(Atom).
    You must have seen that this Subscribe to:posts(Atom) at the bottom of your Blogger Blog.Blogger added it to every blogger blog for your visitors to subscribe atoms feeds.Do you thinks that it is quiet boring? Here a simple tip to remove it.
    First of all 

    • Sign In to your Blogger Account and Go to Design->Edit HTML
     Important:You must tick the check box  Expand Widget Templates
    • Find the following and delete it
    <b:include name='feedLinks'/>
     Or put inside this (<!-- -->) like this <!-- <b:include name='feedLinks'/> -->

    Its done...